SQL Server Shared Management Objects (SMO) Introduction
-
Posted on February 16, 2013 by sqlservercowboy
-
1
SMO stands for Shared Management Objects. It is a SQL administration API used to get meta data information from SQL Server. You may ask “Why? I can already do that”. True, but what if your only need was to have a tool that could do some of the following:
- Backups and restores
- Create some test databases
- Maybe even export some SQL Server related information to an Excel Spreadsheet
This tutorial focuses on getting started using this powerful API in your .NET applications. Mind you, this is not a replacement for SQL Server Management Studio (SSMS). This tutorial just gives you the initial steps you need to progress more in the SMO related technosphere.
What Do You Need to get Started?
- SQL Server 2005 onwards
- Shared Management Objects Installed (Required Assemblies)
- Visual Studio Professional or Express editions (2005 onwards)
..and finally, the will and enthusiasm to build your first SMO application.
For this tutorial we’ll be using:
- Visual Basic 2010 Express Edition
- SQL Server 2008 SP1 with Shared Management Objects
- Along with the following assemblies to be imported:
- Microsoft.SqlServer.Smo
- Microsoft.SqlServer.Management.Sdk.Sfc
- Microsoft.SqlServer.ConnectionInfo
- Microsoft.SqlServer.SqlEnum
What Are We Going to Accomplish?
To keep things simple we are going to populate a list of databases from the SQL Server Express instance, similar to SQL Server Management Studio. Let’s begin.
1) Launch Visual Basic Express Edition 2010. Click on File > New Project > Windows Application as shown in the screen below. Enter the Project name as you please. I have entered SMOApp:

2) Now from the Toolbox place a TreeView Control onto the Form. Dock it to the left.
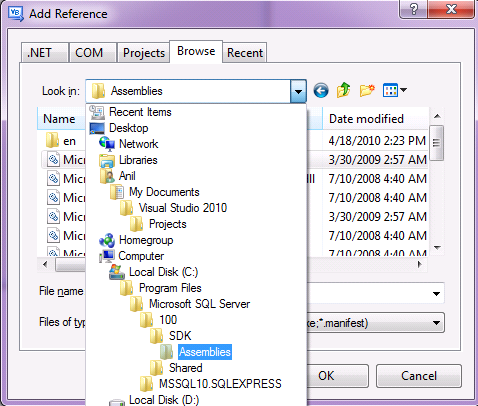
3) Next let us turn our attention to adding the needed assemblies. Right click on References > Add Reference:

4) Now your References should resemble as shown below:

5) So now that everything’s in place, let’s start coding!! Yeah!!
Double click the form to launch the Code Window and copy and paste the code as shown below:
[cc lang=”C#”]
Imports Microsoft.SqlServer.Management.Smo
Imports Microsoft.SqlServer.Management.Common
Public Class Form1
Public Sub LoadDB()
‘Declare an instance of the Server Class along with the Connection String
Dim Mysvr As New Server(“.\SQLEXPRESS”)
‘Declare a Database Variable that will enumerate in the TreeView
Dim db As New Database
‘Now iterate through the list of databases within the server
For Each db In Mysvr.Databases
‘We are now going to populate the TreeView Nodes with the Databases
TreeView1.Nodes.Add(db.Name)
Next
End Sub
Private Sub Form1_Load(ByVal sender As System.Object, ByVal e As System.EventArgs) HandlesMyBase.Load
Try
LoadDB()
Catch ex As SqlServerManagementException
MessageBox.Show(“Error” + ex.Message, “Error”, MessageBoxButtons.OK,MessageBoxIcon.Error)
End Try
End Sub
End Class
[/cc]
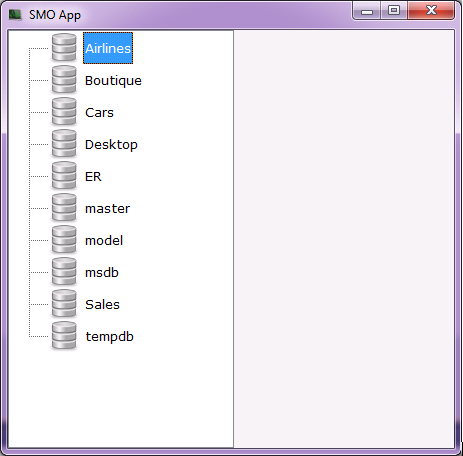
I have added some beautification to simulate it like a real Database Explorer as shown below. Feel free to experiment with your own images. The final output is shown below:

Well, wasn’t that easy :-)?
The next article in the series is coming soon. Do let me know your feedback. You can e-mail me anil.mahadev at gmail.com with the SubjectLine: indicating SMO Article.
- Comments (RSS)
- Trackback
- Permalink


